
How to Set Up Your Own OpenCTI Server with Docker.
If you want a threat intelligence platform of your own and you have a machine with Docker on it, OpenCTI is one of the best ways to get started. It is the open-source platform built by Filigran, and the community edition is free to run. It stores threat actors, malware, indicators and reports as a connected STIX 2.1 graph rather than a pile of documents, which means you can actually pivot from an indicator to a campaign to a technique the way analysis is supposed to work.
This post walks through a full local setup, start to finish. By the end you will have an instance running at http://localhost:8080, pre-loaded with the complete MITRE ATT&CK dataset and ready for your own intel. We have deployed this stack for real, and the official docs are good, so we are not going to rewrite them here. What we are adding is the sequence that works and the handful of gotchas that cost us time, at the exact step where you would otherwise hit them.
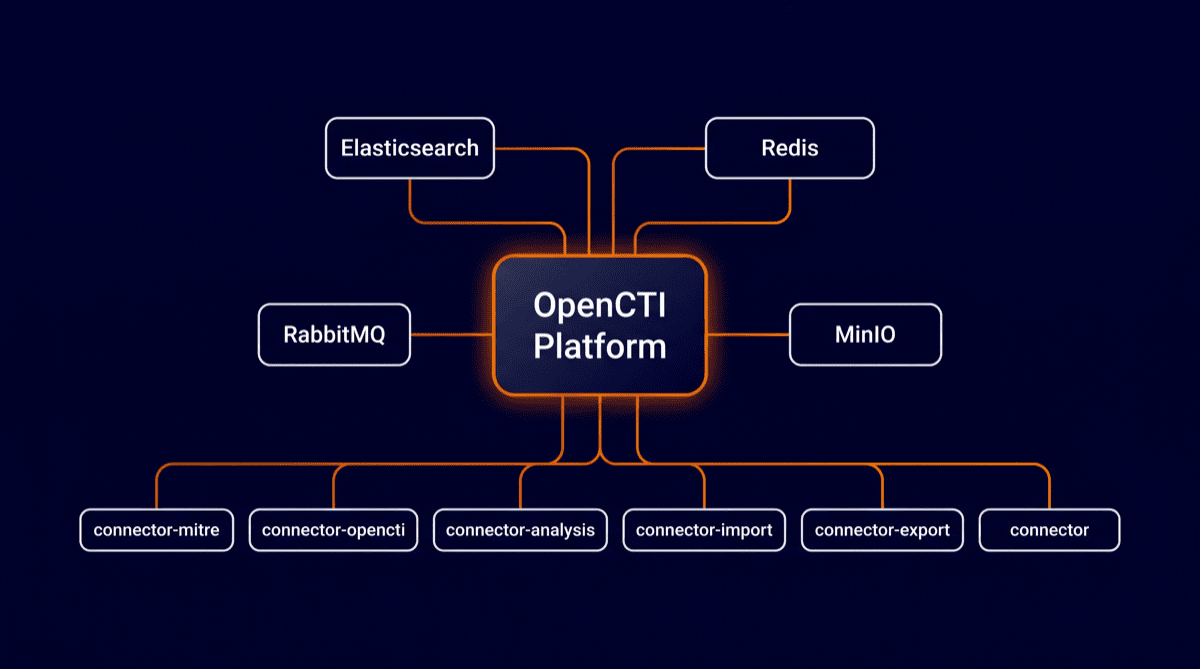
A one-paragraph tour of what you are about to run: OpenCTI is a Node.js platform plus a set of workers, backed by Elasticsearch for storage and search, Redis for streams, RabbitMQ for queueing and MinIO for file storage. Around that core sit lightweight connector containers that import and export data. All of it runs from a single Docker Compose file that Filigran maintains, which is why the whole thing can be up and running inside an hour.
Prerequisites
Check these before you start, in this order:
- Docker Desktop (or Docker Engine on Linux) with at least 8 GB of RAM allocated to Docker. Elasticsearch is the hungry one, and an under-provisioned Docker VM is a common root cause of “OpenCTI is slow” complaints.
- 30 GB of free disk as a comfortable floor. The images alone are around 5 GB, and Elasticsearch indices grow with everything you ingest. Check this before starting, because Elasticsearch behaves badly on a full disk: at roughly 95% usage it flips its indices to read-only and your imports stop dead.
- Linux only: raise the memory-map limit that Elasticsearch requires:
sudo sysctl -w vm.max_map_count=1048575On Docker Desktop for Mac or Windows this is normally already set inside the VM, so skip it unless Elasticsearch crash-loops complaining about max_map_count.
Step 1: Get the deployment repo
Filigran publishes the Compose files in a dedicated deployment repo. Note that this is not the source repo (OpenCTI-Platform/opencti); you want the one called docker:
git clone https://github.com/OpenCTI-Platform/docker.git opencti-docker
cd opencti-docker
Check it worked: ls should show docker-compose.yml and a .env.sample file.
Step 2: Configure your .env properly
This is the step that is easy to rush, and rushing it is how instances end up on the internet with default credentials. Copy the sample and then replace every changeme and ChangeMe value in it:
cp .env.sample .envThe values that matter most:
OPENCTI_ADMIN_EMAILandOPENCTI_ADMIN_PASSWORD: your login to the web UI.OPENCTI_ADMIN_TOKEN: this one must be a valid UUIDv4, and it doubles as the API bearer token. Anyone who has it is admin on your instance, so treat it exactly like a password.OPENCTI_ENCRYPTION_KEY: generate withopenssl rand -base64 32.OPENCTI_HEALTHCHECK_ACCESS_KEY: any random string or UUID.- The MinIO and RabbitMQ credentials: a fresh
openssl rand -hex 16for each. - Every
CONNECTOR_*_ID: a freshuuidgenfor each one. These are just unique identity keys for the connectors, but they do need to be unique.
Two commands cover everything, run as many times as you have fields to fill:
uuidgen                # run once per UUID field
openssl rand -hex 16   # run once per password field
Then set ELASTIC_MEMORY_SIZE. Use 4G if your Docker VM has 10 GB or more; 3G works fine on an 8 GB Docker VM for evaluation workloads (we have verified this, it holds up). Leave yourself a comment in the .env explaining the choice, because future-you will not remember why it is not the default.
One more thing you will notice in the current .env.sample: variables prefixed XTM_ONE_*, plus PLATFORM_REGISTRATION_TOKEN. The upstream Compose file now also ships Filigran's XTM One services, a separate enterprise-oriented platform with its own Postgres. A community install does not need any of it, and in the next step we simply will not start those services. Their values still ship as ChangeMe placeholders though, so overwrite them with random strings like everything else. It costs you three more openssl rand runs, it keeps the check below honest, and nothing sits on a default if you ever do start those services.
Finish by locking the file down and saving the admin credentials somewhere safe:
chmod 600 .envCheck it worked: grep -i changeme .env should return nothing.
Step 3: Launch, but only what you need
The reflex here is docker compose up -d, but on the current repo that would also start the XTM One services you do not need. Name the services instead. Compose automatically starts their dependencies (Elasticsearch, Redis, RabbitMQ, MinIO), so this brings up the whole community stack. Put the list in a shell variable, because you will need the exact same list again for upgrades later:
SERVICES="opencti worker \
  connector-export-file-stix connector-export-file-csv connector-export-file-txt \
  connector-import-file-stix connector-import-document connector-import-file-yara \
  connector-analysis connector-import-external-reference \
  connector-opencti connector-mitre"

docker compose up -d $SERVICES
The first run pulls around 5 GB of images, so give it a few minutes. After that, Elasticsearch takes one to three minutes to go healthy, and the platform boots once it has. You do not need to manage that ordering yourself; the Compose healthchecks handle it.
If you are on Apple Silicon, read this first
The core platform images are arm64-native, but the opencti/connector-* images are amd64-only. On an M-series Mac the pull fails with no matching manifest for linux/arm64/v8. The fix is a small override file that pins each connector service to the amd64 platform. Rosetta runs them fine; they are lightweight Python processes and you will not notice the emulation:
# docker-compose.override.yml
services:
  connector-mitre:
    platform: linux/amd64
  # ...repeat for every connector-* service in your up command
Docker Compose picks up the override file automatically. Re-run the up command and the pulls go through.
Step 4: Verify it is actually working
docker compose psEverything should show Up, and the platform container should show (healthy). Then open http://localhost:8080 in a browser and log in with the admin email and password from your .env.
Next, hit the health endpoint with the access key you set earlier. This prints just the HTTP status code, and you want to see 200:
curl -s -o /dev/null -w "%{http_code}\n" \
  "http://localhost:8080/health?health_access_key=<YOUR_KEY>"
Then a quick API smoke test, which also proves your admin token works as a bearer token:
curl -s http://localhost:8080/graphql \
  -H "Authorization: Bearer <OPENCTI_ADMIN_TOKEN>" \
  -H "Content-Type: application/json" \
  -d '{"query":"{ connectors { name active } about { version } }"}'
Every connector in the response should report active: true.
Finally, the payoff. The MITRE connector starts ingesting ATT&CK automatically, and the first sync takes about 10 to 15 minutes. Watch the Attack Patterns count climb under Techniques in the UI; when it settles somewhere above 500, your instance has the full framework and you have a working threat intelligence platform.
The gotchas we actually hit
Everything above is the happy path. These are the problems we actually hit, with the cause and the fix for each.

1. Connectors crash-loop right after first boot. You see KeyError: 'name' or AUTH_REQUIRED errors in the connector logs. The cause is a race: the dataset connectors came up while the platform was still doing its first-boot initialisation. The fix is a one-time docker restart <connector-container> once the platform shows healthy. It does not come back after that.
2. Image pulls fail on Apple Silicon. The no matching manifest for linux/arm64/v8 error from Step 3. Fix: the docker-compose.override.yml pinning connectors to linux/amd64.
3. Uploaded STIX files do not import. You upload a bundle and nothing appears in the graph. With CONNECTOR_VALIDATE_BEFORE_IMPORT=true, which is the Compose default, uploads land in the analyst workbench awaiting human review instead of importing directly. Either validate them in the UI under Data → Import, set the variable to false if you trust your sources, or trigger the import programmatically with the askJobImport GraphQL mutation and bypassValidation: true.
4. Elasticsearch exits immediately on Linux. Almost always vm.max_map_count set too low. The sysctl command from the prerequisites fixes it.
5. Everything is slow, or containers get OOM-killed. The Docker RAM allocation is too small. The Elasticsearch heap plus the platform plus three workers plus around ten connectors need roughly 7 to 8 GB in total. Either lower ELASTIC_MEMORY_SIZEor raise Docker's memory limit.
6. The disk fills up over time. Elasticsearch indices grow with everything you ingest, and at around 95% disk usage Elasticsearch flips its indices to read-only, which looks like a mysterious import failure. Keep an eye on docker system df and df -h before it gets there.
Day-2 operations
The commands you will actually use once it is running:
docker compose stop      # pause everything (data kept)
docker compose start     # resume
docker compose down      # remove containers (volumes and data kept)

# upgrade to latest images (reuse the SERVICES list from Step 3)
docker compose pull $SERVICES && docker compose up -d $SERVICES
Resist the urge to shorten that upgrade line to a bare docker compose pull && docker compose up -d. The bare form pulls and starts everything in the Compose file, so you would suddenly be running the XTM One stack you deliberately avoided in Step 3, and on Apple Silicon some of those extra images can fail to pull and break the upgrade outright. Naming the services keeps the upgrade scoped to what you actually run. The variable only lives in your current shell, so re-declare it when you open a new terminal, or keep the whole thing in a small upgrade script next to the Compose file.
And the footgun:
docker compose down -vdestroys all your data, because the-vremoves the named volumes where everything lives. Your data survives every other command on this list, including full container removal and upgrades. It does not survive that one.
Where to go next
A fresh instance with ATT&CK loaded is a foundation, and the natural next step is feeding it. The community maintains connectors for AlienVault OTX, AbuseIPDB, MISP, CISA KEV and many more; each is an additional service in the Compose file that needs its own UUID plus the feed's API key, and don't forget to add it to your SERVICES list. On Apple Silicon, each new connector also needs its own platform: linux/amd64 line in the override file from Step 3, or you will meet the same pull failure again and wonder what changed. The full catalogue is in the connectors repo.
When you outgrow localhost and want the team on it, put the stack on a proper server, add TLS with a reverse proxy in front, and configure SSO. That is deliberately out of scope for this post, and the official deployment docs cover it well. And if you are still weighing up what a threat intelligence platform should do for you in the first place, we have written about that too.
One last idea before you wire up real feeds: a brand-new instance looks empty, and dashboards are much easier to evaluate with data in them. Populating a fresh instance with synthetic STIX data is a nice way to kick the tyres properly. That one deserves a post of its own.

